Tuesday, October 25, 2016

Raspberry Pi Robot with PiShield, Part 3: Fast video streaming

I fiddled for a good part of the day trying to find a low-latency local network video streaming solution to implement a "FPV"-like control for the robot using a RPi camera module. It turns out a bunch of existing solutions (like VLC streaming etc) have really high latencies. This is OK for things like a security camera, but not so much for realtime control.

Finally, this rather hacky solution using netcat appeared to work best:

1. On the client (viewer/controller, running on a Mac) side, run:

 nc -l 5000 | mplayer -fps 30 -cache 1024 - -x 640 -y 360

 2. On the RPi side, run:

 raspivid -n -t 999999 -fps 12 -rot 180 -o - | nc IP_OF_VIEWER 5000

 netcat is used to listen and send; raspivid grabs the video and pipes it to netcat, and on the other side netcat pipes the received data and spits it into mplayer.

 This was the only way I could get less than 1s of latency on the video feed, although it still wasn't great. Having a good USB wifi dongle also helped a bit. Finally, changing the dimensions of the video using raspivid actually made it much slower, probably due to software resizing of each frame on the fly compared to just sending out the raw feed from the camera.

 Next steps: get some more interesting sensor info from the PiShield, and get a separate power source since there seem to be random system freezes when the motor and Pi are both running off the same power bank.

UPDATE Oct 26:

with the advice of a very helpful redditor who suggested gstreamer, I gave it a shot this evening.

On Raspbian, gstreamer1.0 is currently already in the official repos, so no need to add custom sources as these earlier instructions.

For OSX, I just downloaded and installed the latest compiled version from the official source. It also handily tells you that by default the path for the commands are at

/Library/Frameworks/GStreamer.framework/Commands/

From here, we can either have a tcpserver on the Pi that a client can connect to, in which case:

RPi:

raspivid -t 0 -h 720 -w 1080 -fps 25 -hf -b 2000000 -o - | gst-launch-1.0 -v fdsrc ! h264parse !  rtph264pay config-interval=1 pt=96 ! gdppay ! tcpserversink host=minibian.local port=5000

Mac (note explict path to gst-launch-1.0 command, since I haven't added it to path):

/Library/Frameworks/GStreamer.framework/Commands/gst-launch-1.0 -v tcpclientsrc host=IP_OF_RPi port=5000  ! gdpdepay !  rtph264depay ! avdec_h264 ! videoconvert ! osxvideosink sync=false

Now UDP would be faster, and in this case it would be similar to the netcat example where the RPi would define the UDP "sink" using the IP address and PORT of the viewer (on the Mac), which would yield the following:

RPi (note destination should be explicitly defined by the source this time):

raspivid -t 0 -h 720 -w 1080 -fps 25 -hf -b 2000000 -o - | gst-launch-1.0 -v fdsrc ! h264parse !  rtph264pay config-interval=1 pt=96 ! gdppay ! udpsink host=IP_OF_VIEWER port=5000

Mac:


/Library/Frameworks/GStreamer.framework/Commands/gst-launch-1.0 -v udpsrc port=5000  ! gdpdepay !  rtph264depay ! avdec_h264 ! videoconvert ! osxvideosink sync=false

Eye-balling the two versions, I feel like the UDP version is slightly snappier, but considering that my network is not very congested, I have a feeling the difference wouldn't be as much as if I had a lot of traffic running. Regardless, this is a HUGE improvement over the existing solution! Should try to do some timing tests to see if I could get a better measure of the actual latency - perhaps using a photo of a stopwatch like this guy did (which was one of many sources I originally consulted for the netcat solution above as well)!

finally, here's a test on the actual video latency of the setup above: looks like its somewhere between 150 and 200 ms.


FINAL UPDATE (Jan 2017)

Yet another option, is to use RPiCamWebInterface. In the end I didn't get around to do the latency measurement, but it feels *almost* as fast as the previous solution. The other bonus is the client user interface is far nicer!

Here's a sample video showing the stream in action:


Tuesday, October 18, 2016

Raspberry Pi Robot with PiShield, Part 2

The previous post showed the basic functionality of the Raspberry Pi Robot. The Arduino-based motor driver takes in commands to drive the robot in different directions, can be controlled remotely in a serial terminal via SSH using the screen application.

This is what the system looks like:


The Raspberry Pi talks to the Arduino via USB serial. The movement commands are sent from the Pi to the Arduino, currently, 'w', 's', 'a', 'd' to toggle movement, and ' ' (space) to stop. there are also ASCII numbers 1-6 that correspond to PWM values to control the speed of the motors. While it would be possible to control the motor driver with the GPIO pins of the RPi directly, I had that other circuit all hooked up from a previous project, and all it required was a single USB cable to the Pi, so I went with that instead of rewiring everything.

This time, we want to start doing something a bit more fun. Here's a preview of the end result:


The premise of the example is quite simple: get too close to the robot, and it runs away from you!

We use Python this time to implement the sensing behaviour. The source code that implements the above is available here. I call this one the PyPiBot as it runs on Python... ;)

Basically, what it does is the following:

Initialization:

1. Open SPI device for getting sensor data from the PiShield 
2. Open serial port (for sending commands to the motor driver)

Main loop:

1. Get data from sensor port
2. If sensor value is greater than a certain threshold trigger a move forward routine:
   - send a 'w' to the robot, which puts it in forward mode
   - wait a second (sleep)
   - send a ' ' to make it stop
3. Check for ctrl+c and quit the program

What you notice about this particular script is that it is blocking, which means that while the robot is in the move forward mode and the script sleeps, you can't respond to anything else. We'll tackle that in another example in the future!


Friday, October 14, 2016

Raspberry Pi Robot with PiShield, Part 1

Using the base from Tippy, I've started building a Raspberry Pi powered, sensor enabled robot. Currently, you can SSH into it and control it via the serial port. The original Arduino-based motor driver from Tippy is still there, but in theory we could just send out PWM and control signals from the Pi directly.

Main components:

- Raspberry Pi Zero with inline 2-port USB adapter:
- - Port 1: wifi dongle
- - Port 2: Arduino USB serial
- PiShield Sensor Interface (current Kickstart project here)
- 5000 mAh OCHO mobile power bank (1A and 2.1A outputs).
- Arduino and Sparkfun motor driver. Its been a few years since I ordered that part. This one has two channels with PWM input for each channel for speed control. There are now ones that fit directly on the Raspberry Pi as well which could be more convenient to use...
- Tamiya Track and wheel set. Really handy little platform for making a basic tracked robot. One of the cheapest options out there too.

My idea is to add sensors to the PiShield, and then have it react to local environment conditions in addition to receiving wireless commands. The software I'm running on the Pi is the latest minibian, which usually boots up and gets an IP from my router in about 10~15 seconds.

Could this have been done on an Arduino or even an ESP8266 based board? Sure - but its kinda neat to be able to run linux on-board in a relatively compact package. Stay tuned for more updates!

p.s. apologies to /r/cablemanagement. This part is clearly not my strong suit... ;)


Wednesday, October 05, 2016

5V power supply shootout

As I've got quite a few Raspberry Pi's in employed in various settings, one constant issue is finding the right power source for them. The Pi3, for example, is supposed to require up to 2.5A under heavy use (I presume a lot of wifi activity + fully loaded CPU/GPU, which is probably not likely to happen all the time). However, it's always good to know where the limits lie. I've been running a Model B on a wifi dongle + USB webcam as a streaming home surveillance system for a while now, on a "measly" 1A adapter without any issue (its a Nexus 4 charger, results below explain the quotes around the word "measly"...), which is probably living a bit dangerously perhaps... Anyway, here's some tests I did recently, along with lots of pictures to show for it!

First up, the test equipment. Here I'm testing a Nexus charger (1A), Samsung Tablet charger (2A), a 2.2A supply from Element14, and a cheap "2A" supply from a dealer on AliExpress. Near the top left are the key components for the test, which will be displayed in a larger image following this one:


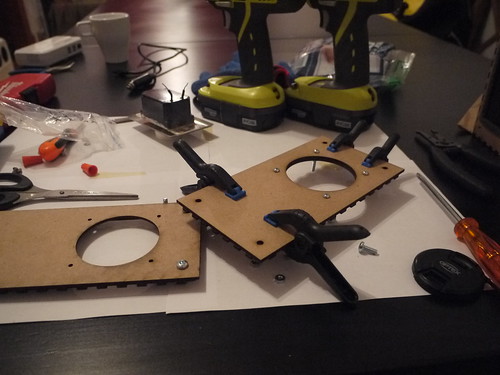
Here are the interesting pieces of test equipment. On the left is a "USB charge doctor". They're available for a couple bucks on AliExpress. (e.g. link here.) There are a number of models out there at different prices, but their main feature is to be able to sit between a female USB outlet and a device connected by a male cable, and measures the voltage and current. Another cool feature of this particular one is it also has a resettable energy counter. This basically sums the amount of energy that has gone through, and is good at things like measuring how much capacity is left in your battery, or what the effective output capacity of a mobile power bank is. For example, on our aging Nexus 4, if I deplete the battery completely and charge it (system turned off), it measures about 1600mAh, which is quite a bit below its factory spec of 2100mAh. Our Nexus 5, much used but in newer condition with fewer cycles, reads about 2000mAh (out of 2300 new).


Plugged into the USB power meter, is a funny device with two large green resistors on it. This is a switchable dummy load that can be set to draw either 1A or 2A from the USB port it is connected to. Using basic Ohms law we can see that the resistors are most likely 5Ohms each, and the 1A mode just makes use of a single resistor (drawing 5V/5Ohms = 1A) while switching to the 2A mode, puts two in parallel (5V/2.5Ohms = 2A). There's also a handy two colour LED that lights up either green in 1A mode or red in 2A mode, assuming the power source doesn't crap out completely (see later tests).

The next funny device is a hacked microUSB female to female USB adapter. This is required in order to use the power meter with the chargers that have microUSB ports hardwired to them. Here are the chargers: Note that two of them are hardwired. I use a 1m Aukey microUSB cable so that they can be used with the same funky adapter (explained later). Aukey, along with UGreen, Anker, and a few other "respected" brands, provide quite high quality products from the AliExpress marketplace at a price that is a compromise between so-cheap-you're-surprised-they-even-work (and most often they don't) and arbitrarily-expensive-north-american-department-store levels.


Below shows the setup for the cellphone chargers. Since 

I could simply plug the USB power meter and dummy load directly into the charger (and is in fact what I'd normally do). However, I deliberately introduced the extra USB cable so that I could use my home-made adapter in between. This is because when I was making it, I realized that the wires of the USB extension cable I sacrificed, as well as the traces on the female microUSB adapter board was a bit on the thin side. If the resistance was significant, it may cause a noticeable voltage drop when using this adapter, and would have a negative impact on the observed performance of the charger. This way, any potential degradation would be consistent throughout all our tests. (The flip side of course means that I wouldn't be able to make a very convincing critique of the absolute performance, only how they measure up against each other....)


 So then, with a wired charger, this is what the setup looks like:


After that wall of text and pictures, lets finally get down to some results!!


Nexus 4 charger. 1A setting. 4.62V, 0.82A. Note the green light.

Nexus 4 charger, 2A setting. 3.94V, 1.37A. The power meter will probably crap out at some voltage threshold, but here we see its still kicking away, drawing way beyond its rated capacity...

Next we have the Samsung 2A charger. Here we see it at 4.6V, 0.83A for the 1A setting, and 4.53V, 1.65A for the 2A setting.


Onto the 2.2A rated charger from Element14: at 1A, it measures 4.83V at 0.9A


And at 2A, 4.5V and 1.65A


Finally, we have the cheapo 2A charger: even at 1A, the voltage drops down to 3.97V, and outputs a measly 0.7A


 And when trying to put a 2.5 Ohm load to draw 2Amps: .... uh oh.


Well, at least the red light gives off a feeble glow, showing that its at least trying. The voltage has dropped so low that the power meter no longer turns on. At some point I could easily verify this threshold on a variable power supply at some point...

Finally, just for fun, I got a 5000mAh Mediasonic Ocho power bank. It has a 1A and 2.1A port.

On the 1A port, I get 4.56V at 0.84A


Trying to draw 2 amps on the 1A port, we get a dropout. However, what you may barely make out in the picture below, is that the voltage is just on the threshold for the power meter to almost turn on. This suggests that its doing better than the cheap wallwart above!


On the 2A port, we have no trouble at least keeping things going. 4.27V @ 1.56A. Considering that these guys are supposed to at least register a "charging" status on power hungry tablets, its not surprising that it at least manages to chug along, even if the voltage dips quite a bit... for about $10cad from NCIX when on sale, these guys are an amazing deal.


So, there you have it! Here's all the info consolidated in one place:

Charger      Rated   1A             2A
Nexus 4      1A      4.62V 0.82A    3.94V 1.37A
Samsung      2A      4.60V 0.83A    4.53V 1.65A
Element14    2.2A    4.83V 0.90A    4.50V 1.65A
Cheap0       2A      3.97V 0.70A    N/A
Mediasonic   1A      4.56V 0.84A    N/A
Mediasonic   2.1A    4.64V 0.8A     4.27V 1.56A

Comments and final thoughts

The voltages across the board seems a bit on the low side. This is definitely related to the adapter I built. Due to the thin wiring of the cable and small traces, the adapter's resistance will create a.) a voltage drop and b.) reduce the amount of current (Ohms law here we go again...). As mentioned earlier, I wanted to get a sense of the relative performance of these chargers with respective to each other, and if I removed the adapter for the chargers that don't need it, it would skew the results quite a bit against the wired chargers.

I was especially interested in getting some sort of measurement of these wired chargers that I was especially interested in, as prior to the making of this adapter, I had no way at all of testing their performance in any way (other than to see if a Pi manages to boot and/or display the "low voltage rainbow square").  At the same time, I could unquestionably say that the cheap adapter is totally off in terms of rated performance, not even coming close to performing at its advertised values.

For a more definitive view on the absolute performance of these guys, I should probably look into building a microUSB adapter with beefier wiring to reduce the amount of losses through this part. It might also be good to actually compare the performance of the cheap USB power meter with a decent bench meter to see if there are any discrepancies there as well. 

As one last point - the cheap USB dummy load gets pretty HOT. I would not recommend it for any prolonged tests, and perhaps invest in a headsinked and actively cooled version at some point.

Tuesday, October 04, 2016

Kickstarter is Live!!!

I have a habit of back filling this blog, typically in a sneaky way such that when you visit, it looks like the content has been gradually updated over the years. However, currently due to PhD stuff, family/baby stuff, and various other things, I haven't managed to backfill adequately to get rid of the obvious gaps, so this post will look somewhat unexpected... but here goes: after starting this project about two years ago with Infusion Systems, the PiShield is finally live on Kickstarter!!


Wednesday, July 06, 2016

Jeux d’orgues on iPad with Yamaha CP33

Jeux d'orgues is a neat application that contains a number of French organ samples (link here). There's also an iOS version and Android version (called Opus 1). Using a class compliant USB-MIDI adapter or alternatively directly connecting to the USB-MIDI port, it is possible to play the instrument using external controllers.

Here we see it in action with my Yamaha CP-33. The neat thing is the app supports MIDI CC/PC mappings to trigger different stops, which means I can change them using the built in patch keys of the keyboard!


Friday, November 20, 2015

Lasercut MDF speaker enclosures

A fellow lab mate has been working on neat digital musical instrument design tools and making extensive use of a lasercutter for building prototypes. One thing I decided to try was using similar materials and techniques to quickly make speaker enclosures. I had a few HiVi B3S lying around, and have always wanted to make this design from zaph audio as a simple but good quality sounding kit. (confession: I totally skimped out on the crossover part). My attempt previously had worked, and while the little HiVi drivers gave out quite good sound, I can't help but the enclosures were holding the system back ;). So, armed with a relatively hassle way of quickly making very precise volume boxes together, I cobbled up a design using the handy makerbox.io tool and Inkscape. The former allows you generate finger joint designs of a specific dimension given a number of input parameters (the most important being the thickness of your material). Then I went into Inksscape and carved out the mounting holes and driver cutouts.

The project took two major iterations. First was making a perfectly sized box (according to zaph's design) with the driver and mounting cutouts, and then adjusting it due to issues encountered by the limitations of the materials used (i.e. very thin MDF).

P1050201
Old buildhack, showing the plastic box+cardboard baffle of the previous version and version 1 of the new design with single layer baffle


There were two main challenges I had with the new design, both relating to the baffle, or front surface where the driver is mounted:

1.) Because the 1/8" MDF is relatively thin, the baffle will actually bow forward a bit when the driver is mounted

2.) The finger joints are great at making an enclosed box, but once glued it is impossible to open it again without destroying the box. I didn't have the heart to simply glue everything together, and it's generally good to have your internal components accessible. Therefore, I had to come up with a removable baffle solution.

So, in the second iteration, I decided to double up on the front baffle (by simply gluing two pieces on top of each other), and then adding a non-removable component with a large hole like this:

P1050246

Then, I put some t-nuts underneath the holes, and lined some insulation foam (weatherstripping) for better seal:


P1050251

The t-nuts weren't ideal given the thickness of the panels, but with some glue and coaxing it worked. In the end, this design allowed the front baffle with the driver mounted to be screwed in. Here shows the version 1 (left) and version 2 (right) of the enclosure:

P1050259
Version 1 (left) shows a press-fit of the finger joint, and if I was building a one-off system simply gluing it would have worked but it would be a one-way trip!

The final version adds a bit of extra depth to the front, but allows the baffle to be removed for servicing. There is a slight gap since I recycled the old front baffle piece that had the finger joint edges. If I was to make a new version, I would simply cut out two non-jointed pieces (or even better: use thicker MDF if the cutter allows!). Below you can see the straight-cut piece with the old jointed piece glued underneath:

P1050257

All in all, it was a pretty fun project and good introduction to lasercutting. In terms of the sound while it is significantly improved over the plastic lunchbox design from before, I think it's still quite a bit aways from Zaph's original: no stuffing, box walls possibly too thin, weather stripping is most likely not as airtight as "speaker-grade" seals, and, perhaps most importantly - no crossover to block out the lower frequencies that the drivers would struggle to output anyway). However, powered by a lepai 2020a+ with signal fed by a small bluetooth adapter dongle, it makes a great kitchen/casual listening speaker with sound quality significantly better than off-the-shelf systems at much higher prices.

Here's a PDF of the lasercut outlines (for a real cut you may want to edit the line thickness to 0.1mm, change the colour etc to settings that your lasercutter requires). The design was done on 3 sheets of 30cm x 60cm 1/8" MDF that you can buy from Home Depot for a few bucks. (Thanks again Filipe for the materials+advice!) You'll need to make your own rear exit holes for the connector mounts of your choice: easiest is to just make two holes for banana plugs, which is what I did.

Could I have done this by hand? Sure. It would be a good practice of woodworking skills, and much easier to use thicker materials. However, there are certain things a lasercutter can do very well and for clumsy/lazy people like myself, this was a good excuse to play around and experiment.

Finally, a plug to Central Stamp for the accessible and quick turnaround laser cutting service!

Monday, February 23, 2015

What do you do when you get your 3D printer back online again? Use it to play music of course!
(and spend hours tweaking until a cube actually comes out as a cube...). A MIDI-gcode converter is responsible for converting MIDI notes into frequencies which are mapped to motor PWM signals. Kinda like the more impressive floppy drive organ

Overall I was surprised at how well it kept over time - I had some concerns over the wood warping. However, there were the typical calibration and bed leveling issues that make me wish I had invested in something with a metal chassis made of aluminum extrusions... Oh well, hope the Rhino 3d printer works out! 


Friday, January 30, 2015

Shutting down the RPi gracefully

One of the things thats worth considering when using an embedded linux system, is the integrity of the file system when it comes to pulling the plug. In the past, I've had issues (especially with poor quality SD cards) with file corruption. The RPi should not be simply disconnected from power when you're done, and if you're running an application without console access (either direct or via ssh), its a good idea to implement the means to shut down the system gracefully.

There is a large number of documentation on how this can be done via a physical switch connected to the GPIO pins. For my implementation, I aimed for the following:

- as few components as possible

- as straight forward header connections as possible

To achieve this, I ended up using pin 05 (GPIO03), which is conveniently located next to a GND (pin 6):


This pin has internal pull-up resistors enabled by default, which means you can use an active-low switch without having to add a resistor. To hook this up simply requires a 1x2 header connection attached to a switch (or bare wires, if you're into that sort of thing) on the other side.

Then, I employed the interrupt method (because polling constantly sucks, right? :P) as described here. The interrupt needs to be modified to trigger on the falling edge instead of rising, due to the active-low logic we're dealing with.

The unintentional bonus of using these two pins is that once the Pi is in the halted state, triggering this pin again will boot it up again! (This is likely a built-in feature which I luckily stumbled upon...)

The one weird thing I discovered, was that the interrupts do not fire when the script is running in the background, which might not be suitable for some usage scenarios since it requires load the python script last and keeping it in the foreground. I'm still investigating this...

Saturday, January 17, 2015

Raspberry Pi, openFrameworks, Analog to Digital stuff

Raspberry Pi, openFrameworks

I've been doing some work with the Raspberry Pi lately with openFrameworks, and it has served as a great reminder how accessible these hardware and software platforms are for building stuff.

Setting up the RPi for oF is super simple, and relatively well documented. The extra hurdle that is worth jumping over in the setup process, is cross compilation. I followed the official guide here, and found a few steps that were missing. The cool thing with oF is that its a very active community, and I was able to update the documentation, and push it to the official webpage within a matter of hours. Currently the instructions should be up to date for the active version (0.8.4).

Cross compiling on a desktop (i7-4770k) VM running Ubuntu sped up the compile time from over 1 hr for the entire library to less than 1 minute. Basic apps went from 2-3 minutes to a couple of seconds. Therefore, the amount of time it takes to set up the cross compile is more than worth it for any kind of significant dev work. Currently my setup involves SCP'ing the compiled binary to the RPi, but it would be possible to set up the shared file system to avoid this step. DistCC is also another way but is slightly more involved (IMO).

Media Performance

One of the applications I'm currently working on for the RPi, is the interactive playback of videos. Due to the well optimized GPU libraries available, the RPi has quite impressive video decoding capabilities for the amount of overall raw processing power. For oF, there is a nice wrapper of the OMXplayer on the Pi which takes full advantage of the hardware decoding capabilities. As such it is possible to easily run HD video in an interactive application in your openFrameworks app. Here's a nice page from creativecoding.net describing a few things you can do to get started with oF and Rpi

Analog to Digital on the RPi

One thing that the RPi lacks, compared to other boards like the BeagleBone Black, is built in analog to digital (A2D). The 26 GPIO pins (or 40 on the newer A+/B+ models) are digital only, so if you want to interface analog sensors, you have the following options:

- Use another microcontroller (such as the Arduino, teensy, etc) on the USB port and run an app that talks to the virtual serial-USB. This is quite common since the set up is very similar to when using such a microcontroller with a desktop/laptop environment. However, it does add a greater cost, and also on systems like the A/A+ board, you only have a single USB port that you might want to use for something else without having to add an extra hub...

- Interface an A2D on the GPIO. There are a few common methods, and each one requires some hardware that provides either: UART, I2C, SPI, or cook you own A2D solution such as described in this excellent post by Hertaville that also demonstrates how typical A2Ds work. For my initial attempt, I used the MCP3008 SPI chip, due to local retailer availability and some quick online reading. To get the pins of the RPi easily exposed on a breadboard, I used the ElecFreaks GPIO adapter kit. I'm not sure if I'm using it correctly, but there seems to be a major flaw in the design of this adapter board: the power rail pins do not line up with the rest of the header pins. Either I'm not using it the right way, or there was a bit of a design flaw here...


Anyway, here's a quick screenshot of a quick test program using using the wiringPi library:


Next steps: brushing up my PCB design to build a small breakout board for this chip, as well as looking at potential alternatives. The drawback of this SPI implementation is that without any further multiplexing, we're limited to one of two channels, which means a max of 16 input pins using 2 MCP3008's.

Sunday, January 04, 2015

DIY cheap-fancy speakers

Swan HiVi 3 inch "full range" speaker drivers (somewhat fancy), housed in the most budget enclosure. Consider using them in stand-alone digital musical instruments, although their weight was surprising. Also sounded quite anemic with a small 5W amp... may need something beefier, which drives up the power budget for portable applications. Right now we're testing these alongside the Pyle 4" cubes, which are amazing little boxes for their price. I suspect a better enclosure, and a low frequency cut-off will make these Swans sound even better...

P1040134

Tuesday, June 17, 2014

Air Organ

I was fortunate enough to have access to a MIDI enabled Casavant organ at our church. The organ is a fascinating instrument in many ways, but one particular is the fact that it was the first instrument where you can change the mapping between the input and output on the fly, and that is an otherwise exclusive feature of new digital musical instruments.

With the ever-improving Leap Motion SDK, and some work related motivation to "yarpify" things, I got the following running after struggling with some typos in my SYSEX messages that are used to control the organ.


The above shows one simple mapping: X (left right) controls the pitch, and moving the hand forward goes from no sound, to a single stop, to a second stop that's making notes a third higher. What was immediately interesting was that the digital control of the organ is extremely fast, and glissing through in this manner created runs that are basically impossible to do on a standard keyboard (well, maybe if you practiced some two-hand technique where you can time the black notes in between the white ones...). Also, it was very apparent that a simple linear X-position to pitch is highly unnatural when you don't have the tangible feedback of a physical, rectangular keyboard.

Friday, May 31, 2013

PENny, a low cost pressure sensitive stylus

PENny is a cheap pressure sensitive addition for a capacitive touch screen. Using the built in audio input and output and an extremely simple passive resistive network, an extra degree of expressivity can be added. Here we see Nicolas testing it out before flying to Korea for NIME2013. Full paper here.

Wednesday, May 01, 2013

Third Places Workshop@CHI2013, Paris

Coffee shops, Paris, and mobile phone choirs - we're very excited to present at the HCI-3P workshop for CHI2013 on bringing music-making to "Third Places" using technology (Extended abstract here). Part of the workshop activities include visiting typical 3rd places (restaurants, bistros, cafes) around Paris.


Somewhat related: here's a visit to Chopin's grave at Père Lachaise Cemetery during one of the afternoons I sneaked off from the conference :)

Monday, August 27, 2012

Vox Tactum is in Europe!

Vox Tactum is touring Europe! We're putting together an interactive art installation based around ChoirMob/(new)Vuzik in the City of Mons in Belgium for the City Sonic festival. The installation runs from Aug 31 to Sep 16. Check out the webpage for more details!

In mid Sep we'll be at ICMC 2012 performing Aura's latest piece for ChoirMob and and Vuzik. In late Sep in Corfu, Greece, for Audio Mostly where we'll be performing Intertwine:


Wednesday, October 05, 2011

Tippy for ICEC 2011

What is Tippy?

Tippy:
- is a Telepresence Robot
- has a simple microcontroller-based drive system
- runs on ANY mobile device with a front facing camera and 2-way video application (such as Skype)
- uses optic coupling to provide a novel interface between the mobile device and drive control hardware
- does not require any other mobile app for operation
- costs less than $100 in parts (excluding iPod touch) if you build it yourself

Tippy allows the user to achieve telepresence by leveraging powerful, existing mobile devices quickly and easily. Tippy can be easily packaged into other formats using different sized devices (smartphones, handhelds and tablets) without custom mobile applications and the control scheme can be adapted to control any kind of external hardware.

For more information, take a look at our conference paper HERE.

To see Tippy in action, check out the following video:


If you're interested in finding out more, please find our contact info here!

Saturday, May 14, 2011

Mobile Phone Choir

Nicolas and I have been working on the mobile phone choir as a part of the CHI2011 Interactivity demos that took place throughout this past week. We met a lot of really cool people and it was a great experience (1st CHI for both of us). Hopefully we'll be able to take the ideas generated at the conference and develop the system further.

Now a short description of how the system works:

Each mobile phone (in this case, an iTouch or iPhone) is running a voice synthesizer that generates a single note. The player (or singer, or whatever you'd like to call him/her) can control the vocal effort and pitch using the X-Y position on touch screen, and the vocal tract shape by tilting the device. Each device in the video is "tuned" to a certain voice (in this case modelling the spectral characteristics of a soprano, alto, tenor and bass voice, respectively). By default, the center pitch of each device is set so that combined, the 4 voices create a C major chord.

Another app runs on the iPad (controlled by me in the video below). This app is called the "Director" and it sends harmony information to each of the devices. For each chord that the director selects, the individual notes for that chord are sent to each device. This way, the overall harmonic decision is made by the conductor. However, each individual voice has the option to deviate from the selected center note, and Nicolas shows that around halfway through the video.


More on this later...

Friday, April 15, 2011

Tippy the Telepresence Robot

So Vincent, Benny and I have been working on a cute little project over the past few weeks. It's a compact telepresence robot, similar to the one that the famous Johnny Lee wrote an instructional for on his procrastineering blog. The key factor of our design is the optical coupling between the mobile device and the robot control hardware: in our implementation, we use Skype for two-way video but embed the control signals in the video stream as well - thereby reducing the amount of development (in terms of hardware and software interfacing). We've submitted an ICEC demo paper along with the following video, which should do a slightly better job at explaining how it works:


We hope to get together an instructional, and a DIY kit soon so people in the community can play around with the idea (if the video isn't enough to get you going :)

A few points on my personal motivation/comments for this project:

1.) Robots are cool; telepresence robots are also cool.

2.) Mobile devices are so powerful these days that you can do so much with them. However, for the DIY hobbyist/hacker, it's not that easy to interface these devices with custom hardware that you build. For example, on an iOS device (iPhone, iTouch, iPad etc), you are quite limited when it comes to interfacing hardware. Even if you do have a developer license, it's still pretty hard to get a physical connection to the serial port working (at the risk of voiding the warranty and blowing up the device, etc). Using platforms such as Android does away with the license hurdle, but the hardware interface is still not easy. This project is essentially a demonstration at a quick and dirty (but working!) solution to this problem. There are many ways that it can be improved (e.g. modulating the visual signal, auto-calibration of the sensors, etc etc), but it should provide a good starting point.

3.) I'm surrounded by a bunch of amazing people with different skills and really appreciate the opportunity to work with them. This project was definitely worth the evenings and weekends we spent at home or in the lab tinkering away. Good job guys!

Sunday, February 06, 2011

access granted

It's been a while since we finished this project, but I've been neglecting to update this... so here goes: (Video should be pretty self-explanatory).

Sunday, November 28, 2010

The Singing Notebook

As exploratory steps in controlling articulatory speech and singing synthesis (research topic), I hacked some sensors into an old notebook that fittingly contained some notes regarding the hardware I was using.


The book contains a bend and two pressure sensors hooked up to an Arduino Pro Mini interfaced to the laptop using a BlueSmirf serial to Bluetooth interface, and runs off a 1000mAh lipo cell. In the first mapping, the one pressure sensor controlled the lung parameter of the source model driving the synthesis, and the other one the blend between the tube shape for an I and AH vowel. Then, I change the mapping using a preset (on the laptop keyboard) which changes the target vowels used for the blending. Finally, I open the book and show the bend sensor controlling the pitch.